
DTF Printing is transforming garment customization by offering a flexible workflow that works across a wide range of fabrics. By leveraging Direct-to-Film transfers and a DTF heat press, designers can achieve vibrant, durable graphics with less setup than traditional methods. A reliable DTF printer paired with compatible inks ensures consistent color and clean underbase on dark fabrics. Understanding the DTF printing process helps beginners predict outcomes and troubleshoot issues before they arise. Mastering DTF file prep and proper curing with the powder helps maximize transfer quality and edge clarity.
A film-based transfer method, commonly referred to as Direct-to-Film transfers, opens new possibilities for on-demand garment decoration. This approach uses a dedicated PET film, adhesive powder, and heat-press techniques to bind vibrant art to cotton, blends, and synthetic fabrics. In practice, the workflow emphasizes robust file preparation, color management, and precise curing to prevent cracking and fading. If you’re evaluating options, look for a reliable printer ecosystem, suitable inks, and a compatible heat press to ensure consistent results.
DTF Printing Explained: What Direct-to-Film Transfers Really Are
DTF Printing is a versatile garment transfer method where designs are printed onto a special PET film using a DTF printer and compatible inks, then coated with an adhesive powder, cured, and pressed onto fabric. This Direct-to-Film transfers approach delivers vibrant, full-color graphics that can cling to a wide range of fabrics, including dark garments, without the substrate limitations of traditional vinyl or screen printing.
The term Direct-to-Film transfers describes the entire process from digital artwork to a finished garment. It relies on a dedicated ink system and a PET film to create a smooth transfer surface, enabling reliable color reproduction and comfortable hand-feel across many fabrics. Whether you’re a hobbyist, a small shop, or an emerging brand, DTF Printing offers a flexible workflow that can scale from one-off pieces to small runs.
DTF Printing Process: Step-by-Step from Artwork to a Finished Garment
A typical DTF printing process starts with artwork preparation. Designers export a high-resolution PNG with a transparent background and plan a white underbase for dark fabrics to ensure colors stay vivid after transfer. The design is then sent to a DTF printer, using CMYK inks and white where needed, often managed through RIP software for accurate color control.
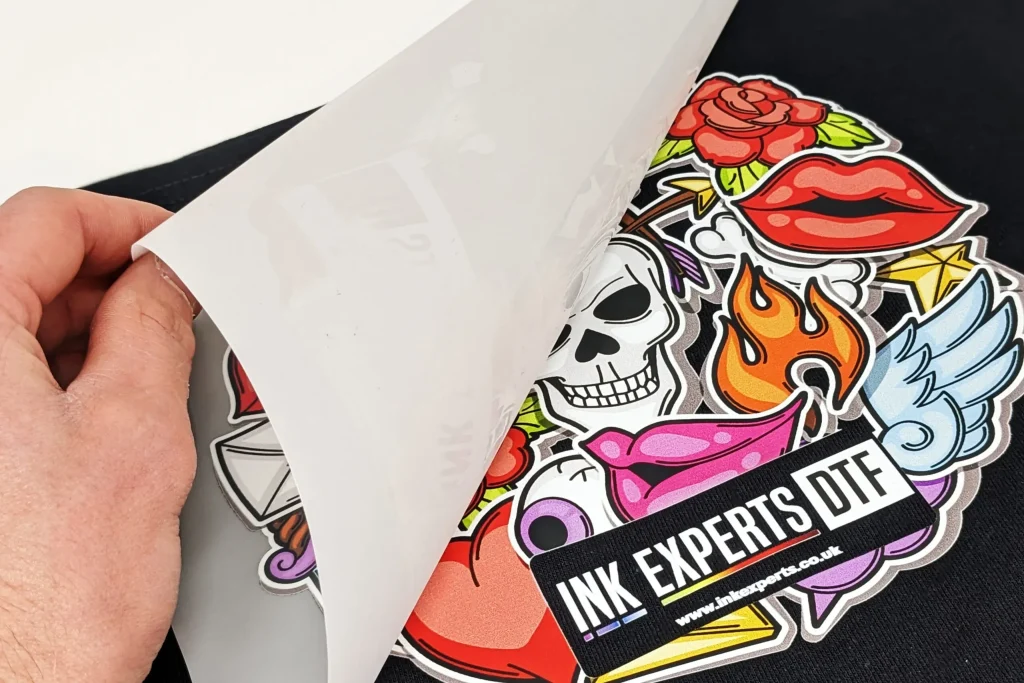
Next, the printed PET film is coated with an adhesive powder while warm, then cured to create a durable transfer surface. The film is aligned on the garment and pressed with a heat press at controlled temperature and pressure, after which the carrier film is peeled away to leave the image bonded to the fabric. Depending on the fabric, a brief post-press or cooldown period may enhance durability.
Choosing a DTF Printer and Materials for Consistency
Selecting a DTF printer involves choosing between a dedicated DTF printer and a modified consumer inkjet. A true DTF printer tends to offer more consistent color and simpler maintenance, while a modified setup can lower upfront costs. Pair the printer with compatible PET transfer film, white and color inks, and a reliable adhesive powder for predictable results.
Materials matter as much as hardware. Use a film that matches your printer and adhesive powder, and ensure inks are formulated for DTF workflows. Don’t overlook curing equipment and a dependable heat press, since powder curing and precise heat application are critical for edge fidelity and wash durability.
DTF File Prep: How to Ready Your Artwork for Perfect Transfers
DTF file prep starts with clean, high-resolution artwork. Use a PNG with transparent background for easy layering on light fabrics, and plan white ink areas in your design for darker textiles. Color management is essential—calibrate monitors, run small test prints, and verify color accuracy before committing to larger runs.
Create a simple color order plan that stacks white underbase first (where needed), followed by the rest of the colors. Keep edge details clean by avoiding overly small features and ensuring crisp lines translate well to the film and eventual fabric. Document the file prep steps to reproduce consistent results across jobs.
DTF Heat Press Mastery: Temperature, Time, and Pressure
The heat press is a critical part of the DTF workflow. Typical settings fall in the range of 160°C to 180°C (320°F to 356°F) for about 15–25 seconds, with firm, even pressure across the platen. Adjustments may be needed for different fabrics and powders, so start with conservative tests and document the ideal window for each material.
A well-tuned DTF heat press delivers consistent results and contributes to wash-durable transfers. After pressing, follow the recommended peel sequence (hot or cool) for your film, and allow the garment to cooldown briefly before handling to reduce edge cracking and improve adhesion on tricky fabrics.
Troubleshooting and Maintenance for Long-Lasting DTF Results
Even experienced crafters encounter issues such as fading colors, brittle edges, or powder not sticking. Start by verifying the white underbase on dark fabrics, checking ink density, and confirming the cure step. Misalignment, under- or over-curing, and improper film handling are common culprits that affect durability.
Maintenance is part of success: clean the print head and film path, inspect white ink flow, recalibrate color profiles, and keep your RIP presets well organized. Regularly check the film stock and adhesive powder, replace worn components, and track settings for future reproductions to avoid repeating mistakes.
Frequently Asked Questions
What is DTF Printing and how do Direct-to-Film transfers work with a DTF printer?
DTF Printing is a process where artwork is printed onto a PET film using a DTF printer and compatible inks, then coated with adhesive powder, cured, and heat-pressed onto fabric. Direct-to-Film transfers enable vibrant, full-color designs on a wide range of fabrics, including dark garments, by using a white underbase when needed. A typical workflow includes printing CMYK plus white ink, applying and curing adhesive powder, transferring at 160–180°C (320–356°F) for 15–25 seconds, and peeling the carrier film to reveal the print.
What is the DTF printing process from design to garment application?
From artwork to garment, the DTF printing process starts with preparing a high-resolution design and exporting a PNG with a transparent background. Using a DTF printer with RIP software, print the artwork onto the PET film with CMYK and white ink if needed, then apply adhesive powder while the film is warm. After curing the powder, transfer the print to the fabric with a heat press, remove the carrier film, and perform a post-press if required for durability.
What is DTF file prep and why is it important for vibrant transfers?
DTF file prep refers to preparing your artwork for printing: use high-resolution images (300 dpi or higher), export as PNG with transparency, plan a white underbase for dark fabrics, manage colors with calibrated profiles, and outline a clear color order. Proper prep ensures color accuracy, clean edges, and reliable white underbase performance, resulting in vibrant, durable transfers.
How do you choose a DTF heat press and what settings are typical for DTF transfers?
Choose a heat press that provides consistent temperature and even pressure across the platen. Typical DTF transfer settings are 160–180°C (320–356°F) for 15–25 seconds, depending on fabric and powder. Ensure stable heat, even pressure, and precise timing to maximize transfer quality and edge fidelity.
What are common troubleshooting tips for DTF Printing using a DTF printer?
Common issues and quick fixes include faded colors after washing (check white underbase and curing temperatures), cracking or peeling (verify press time/temperature and fabric compatibility), uneven white underbase (calibrate the printer and ensure white ink flow), and powder not sticking (confirm even powder application and proper curing). Regular test prints help identify and resolve problems early.
What beginner steps should you take when starting DTF Printing, including DTF file prep and equipment choices?
Beginners should start with simple designs, run small batch tests, and document temperatures, times, and materials to reproduce successful results. Invest in education and a supportive community, choose a reliable DTF printer with compatible RIP software, and perform thorough DTF file prep (high-res PNGs, transparency, white underbase planning) to build confidence before expanding runs.
| Topic | Summary |
|---|---|
| What is DTF Printing? | Direct-to-Film transfers print graphics onto PET film using a DTF printer, apply adhesive powder, cure, and heat-press onto fabrics. This method enables vibrant, full-color designs on a wide range of fabrics (including dark garments) with fewer substrate limitations than traditional vinyl or screen printing. |
| How DTF Printing Works (Step-by-Step) | Prepare artwork (high-resolution PNG with transparent background); print on PET film (CMYK, plus white if needed for underbase); apply adhesive powder; cure the powder; transfer to fabric with a heat press at about 160–180°C (320–356°F) for 15–25 seconds; remove the carrier film; post-press if needed. |
| Equipment & Materials | DTF printer or modified inkjet, PET transfer film, white and color inks, adhesive powder, curing equipment, heat press, RIP software and design files. |
| Artwork & File Prep | Aim for 300 dpi or higher; use PNGs with transparency for light fabrics; plan white underbase for dark fabrics; calibrate colors; include a color order plan; keep edge details clean to avoid transfer issues. |
| Process Considerations | Key focuses include white underbase quality on dark fabrics, edge fidelity of fine lines, color accuracy via ICC/RIP profiles, and ensuring the transfer surface remains soft rather than stiff. |
| Pros & Cons | Pros: vibrant colors on many fabrics; flexible design capabilities; moderate setup cost for small runs; reusable film. Cons: white ink management can be tricky; powder curing adds steps/time; some fabrics may not hold up as well under heavy washing. |
| Troubleshooting | Faded colors after washing; cracking or peeling; uneven white underbase; powder not sticking. Remedies include checking ink density and white underbase, ensuring proper curing temperatures, film alignment, and even powder application. |
| Getting Started Tips | Start with simple designs, run small-batch tests, track temperatures and times, seek education/community support, and maintain equipment and inks to prevent color drift. |
Summary
DTF Printing delivers a versatile, beginner-friendly path to vibrant, durable transfers across a wide range of fabrics. This table highlights essential definitions, workflows, materials, preparation steps, and common considerations to help you plan, troubleshoot, and optimize your Direct-to-Film transfers. By following best practices in artwork prep, equipment selection, and process consistency, you can achieve high-quality results with confidence.

